v3.2 / 2026-05-28
The Caves Of Casadh is a game where players take on the role of spelunkers searching a cave system for hidden treasure and getting back out as safely as they can.
The game begins with all the spelunkers' pawns on the Base Camp Hex. From there, they Explore the caves, drawing new Hex tiles and expanding the game map. With each new Hex drawn, the explorer draws a Card, and the combination of the Hex's features and the Card's effects provide Treasures and Items to be collected, and potentially expose the spelunkers to Hazards and Misfortunes.
Hazards are cave-wide challenges for the spelunkers to avoid or confont (and mitigated by the use of various Items); they become more intense and more likely to affect more of the caves (and thus more of the spelunkers) as the game goes on. Misfortunes tend to be specific events which affect individual spelunkers (and can also be mitigated by use of various Items); they are described on their Cards.
Spelunkers collect these Treasures (and Items to help them) throughout the game, until they decide it's time to leave the caves with their haul. Spelunkers who stay too long in the caves run the risk of being killed by its various Hazards, which will greatly hamper the spelunker's final score. The spelunker with the greatest total value of Treasures by the end of the game is the winner.
 |
Player Mat | A place for each player to place the various Tokens their spelunker collects during the game. Also lists helpful turn summary and icon glossary. |
|---|---|---|
 |
Pawns | Pawns represent the spelunkers' locations as they move through the map as the game progresses. One special pawn is used for the effects of hazards, as needed, as explained in the Hazards section. |
 |
HP Tokens | HP Tokens represent the spelunkers' Health Points (HP); if a spelunker is ever reduced to 0HP, they die, as explained in the Player Turn section. |
 |
Bag Of Fate | This is the bag that holds the treasure tokens. It may say "Crown Royal" on the side, but don't be fooled. |
 |
Treasures | Treasures are gold discs numbered from 0-9, and these represent Victory Points in the game. There are 10 of each in the game, numbered 0-9. They are kept in, and drawn from, the Bag Of Fate. |
 |
Hexes | These make up the board as the game progresses. They are divided into Levels; Level 0 Hexes are special, while Level 1 and Level 2 Hexes are drawn from piles during the game. Hexes contain many features, and these are detailed below. The Base Camp Hex also contains a directional indicator, which is used to determine randomly-rolled directions as needed throughout the game. |
 |
Cards | Cards are drawn whenever a spelunker explores a new Hex; Level 1 Cards are drawn for Level 1 Hexes, and Level 2 Cards are drawn for Level 2 Hexes. Cards have many components, and these are explained later. |
 |
Item Tokens | Square tokens with blue images. These represent the various Items which spelunkers may discover in the caves. |
 |
Effect Tokens | Round tokens with red images. These represent active Hazards and other effects in the caves. |
 |
Hazard Track | This tracks the intensity of various hazards in the caves. Each hazard has a Rating which tracks the likelihood of that hazard becoming Active as the game progresses. |
 |
Die | This is rolled for various things as explained in the apropriate sections. When rolled for a random direction, the direction will be indicated by the corresponding arrow on the Base Camp Hex. |
Each player uses a Player Mat during play to keep track of various aspects of their spelunker.
 |
||
| 1 | Item Locations | These represent the various Item Locations where the Items that the spelunker finds will be stored. These locations are the Head, Pack, Hands, Canteen, and Feet. Spelunkers begin the game with one Pack location, but may unlock another if they find the Heavy Pack; they then place the Heavy Pack token in the provided dashed space, where it becomes available as an additional Pack location. Items with Location specifiers on them must be placed into the indicated Location in order to be Active, meaning that the spelunker may use the item during their turn. Any Item, regardless of Location specifier, may be carried in the Pack or Hands; those without Location specifiers will be Active. For example, Boots must be worn on the Feet in order to be useful, but a spelunker could store their Boots in their Pack for later if they wished. |
|---|---|---|
| 2 | Health / Action Points | The spelunker's HP Tokens are placed here. These are slid up at the beginning of a player's turn, exposing the AP symbols, indicating that these AP are available during the turn. As the player spends AP on Actions, these are slid down to indicate that the AP has been spent. The dashed Rations Item slot is used in the event that a player uses the Rations Item during their turn. This Item token functions as an extra HP, though without the corresponding AP. |
| 3 | Treasure Tokens | The player's collected Treasure Tokens are kept here, face down. |
| 4 | Status Tokens | This is the area for any temporary Status Tokens affecting the player. If the player uses a Dynamite Item, it is moved here to indicate that the Dynamite will explode on the player's next turn (at which point is removed). If the player uses the Grue Repellent, it is moved here to represent that the spelunker is Grue-proof until the player's next turn. These are explained in more detail in the Actions section. |
| 5 | Turn Summary | This is a quick summary of the player's turn. |
| 6 | Icon Glossary | This is a glossary of the icons in the game. The Map section lists the icons found on Hexes, the Effects section shows Effect Tokens (round with red images), and the Items section lists the Item Tokens (square with blue images). The descriptions are terse, making references to the varoious Hazards and Misfortunes affected by the Item. |
Hexes are hex tiles which make up the board as the game progresses. Each hex has passageways and areas which determine the topology of how spelunkers navigate their way through the caves. Each Hex has passageways on all six sides (which connect to adjacent Hexes once they're placed), and many contain other features. Many hexes have multiple passageways, and a spelunker can only be located in one of these. Some passageways are dead-ends, while others go over, under, or intersect with other passageways on the Hex.
Hexes may also display any of the following Icons, whose meanings are explained below.
 |
Level | This is the depth of the Hex. Most of the hexes are Level 1 and Level 2. Special Hexes, such as the Base Camp Hex, are Level 0. Levels are indicated by a pink circled number. The Level of the Hex determines which deck of Cards is drawn from when the Hex is revealed. |
|---|---|---|
 |
Slope | Represented by green arrows. A spelunker may move from one passageway to another in the same Hex in the direction of the green arrow, but not against it. Spelunkers in possession of an active Rope Item are immune from this restriction. |
 |
Hazard | These are represented by brown Hazard Icons. Whenever a spelunker enters a Hex with any Hazard Icons, those Hazards are intensified as explained in the Hazards section. |
 |
Pool | Represented by blue concentric blobs. Any spelunker in the correct passageway on a Hex with with a Pool Icon immediately removes any Thirst! Misfortunes they may have, and may take a Water Item Token for free. |
 |
Entrance | Represented by orange stars on one or more of their six sides. These restrict the orientation of newly placed Hexes; one of the starred edges must be aligned to the Hex which the Exploring spelunker came from (Exploring is explained in the Player Turn rules). If a Hex has more than one star, the player choses which of them to align. Spelunkers with an active Map Item are immune from this restriction. |
 |
Location Marker | The location on the Hex where any Treasures or Items are located. |
 |
Cave Painting | When this Hex is revealed, the Level 2 Hexes are shuffled into the Hex draw deck. |
Hexes may contain Tokens which indicate effects taking place in the Hex. These are temporary effects, separate from the inherent qualities of the Hex. An Effect Token affects the entire Hex irrespective of topography.
Each Hazard has a corresponding Effect Token which, if present, represents that that Hazard is Active in that Hex, and that spelunkers entering the Hex will suffer its effects as described in the Hazard rules.
Other than Hazard Effect Tokens, some other Effect Tokens are listed below.
 |
Bats | A spelunker entering a Hex with this Effect Token takes -1HP. A spelunker with an active Helmet Item Token is immune from this effect. |
|---|---|---|
 |
Methane | A spelunker entering a Hex with this Effect Token takes -1HP. A spelunker with an active Gas Mask Item Token is immune from this effect. |
|
Tremors | A spelunker entering a Hex with this Effect Token takes -1HP. A spelunker with an active Boots Item Token is immune from this effect. |
 |
Grues | Moving into Hexes with Grues in them is more thoroughly detailed in the Actions section. |
 |
Lit Dynamite | Another spelunker has dropped a stick of Dynamite in the affected Hex. A spelunker may attempt to defuse the dynamite by rolling the die; if the die roll is less than or equal to their current HP, then the Effect Token is removed back to the supply, and the defusing spelunker gains a Dynamite Item Token (unless they already have one). If the die roll is greater than the spelunker's current HP, then the dynamite goes off immediately as explained in the Upkeep Turn Rules. |
 |
Lit Flare | Entry into the containing Hex and all adjacent hexes costs 0AP, and Grues may not enter it. |
There are a number of special Hexes (defined to be Level 0).
| Base Camp | This is the game's starting Hex. Any spelunker ending their turn here removes all Misfortunes they may have. Also, they may leave the caves as explained later. |
|---|---|
| Surface Hex | This is the Hex where spelunkers go once they leave the caves. Once on the Surface Hex, a player's turn options change. This is explained in the Player Turn section. |
| Collapsed | These are kept in reserve, and are used to replace other Hexes which have collapsed. |
 |
Here is a typical Level 1 Hex. Orange can collect items and treasures, as well as take advantage of the water to remove the Thirst! Misfortunes, while Blue cannot. Legal exits are shown for the spelunkers as well. |
 |
Were the Hex to contain a slope, Orange would be able to move as shown, though Blue's exits are still limited (unless they had a Rope). |
 |
Some passages go over and under other passages on the same Hex which do not intersect one another. Exits for Orange and Blue are shown. |
Whenever a new Hex is revealed during an Explore action, the revealing player draws a Card from the deck matching the Level of the revealed Hex (Level 1 Hexes get Level 1 cards, Level 2 Hexes get Level 2 cards). Each Card reveals the Move Cost, a number of Items and Treasures to be placed on the Hex, and may contain a Misfortune. Each of these things is described later in the rules.
 |
Move | The number of these icons is the AP cost applied to the spelunker for having explored the new Hex. |
|---|---|---|
 |
Items | For each of these icons, randomly draw an Item and place it face-up in the new Hex. |
|
Treasure | The revealing player rolls the die, draws the indicated number of Treasure Tokens from the Bag Of Fate. They look at them all, keep one, and place the rest face-down in the new Hex. |
| ! | Misfortune | These are listed in red text on cards with exclamation points. The current spelunker suffers the effects listed by the text on the Card. Misfortunes list conditions that allow the spelunker to Ignore the Misfortune. If the Misfortune lists Discard conditions, then the spelunker keeps the card, and continues to suffer its effects, until the Discard conditions are met. Spelunkers may be affected by any number of Misfortunes at the same time. |
Items are gear which the spelunkers acquire while exploring the caves. Some immunize the spelunker from specific Hazards, some immunize the spelunker from specific Misfortunes, and others have other effects. They are revealed by Cards during the Explore action. They are represented by square tokens, and once acquired, must be assigned to one of the spelunker's Item Locations (Head, Hands, Feet, Canteen, or Pack). Only one item can be placed in each Item Location; if a spelunker obtains a Heavy Pack, it acts as a second Pack slot.
Items are either Active or Inactive; Active items may be used by the spelunker as listed, while Inactive items may be carried but not used. Items with gray Location icons must be assigned to the corresponding Item Location in order to be Active; item tokens with no Location icon can be placed in a Pack or Hands slot to be active.
Items with a boxed X are discarded when used, their effects being a one-time bonus.
Spelunkers in possession of a Brass Lantern or who have used Grue Repellent are considered to be Grue-Proof. This describes how spelunkers interact (or, specifically not interact) with any Grues in the caves, and is referenced in many sections of the rules.
 |
Bandages | x4 | Restores 1MP (and the associated AP) to the spelunker; the spelunker cannot exceed 4MP total. |
|---|---|---|---|
 |
Battery | x4 | Immunizes the spelunker from the Flashlight Out! Misfortune. May also be discarded in place of the spelunker losing a random item (as per the Trip! Misfortune), or instead of discarding the Brass Lantern. |
 |
Boots | x5 | The spelunker is immune from the Slip! Misfortune, and from Tremors effects. |
 |
Brass Lantern | x5 | The spelunker is immune from the Flashlight Out! Misfortune, and is Grue-proof as long as the Brass Lantern is active. |
 |
Coffee | x1 | The player gets one extra non-move AP per turn. |
 |
Compass | x1 | Explore actions made by the spelunker always cost 1AP. |
 |
Dynamite | x4 | When used, the spelunker places a Lit Dynamite Hazard Token to their hex. This is explained later. |
 |
Flare | x4 | Once deployed to a hex, any move into that hex and all adjacent hexes cost 0AP. Grues may also not enter the Flare hex. |
 |
Gas Mask | x5 | The spelunker is immune from Methane effects. |
 |
Grue Repellent | x2 | When used, makes the spelunker Grue-proof until the Upkeep phase of their next turn. The Item Token is placed on the player's Player Mat to indicate this. |
 |
Heavy Pack | x4 | The spelunker may carry a second item in their pack. |
 |
Helmet | x5 | The spelunker is immune from the Bats effects. |
 |
Knife | x1 | The spelunker is immune from the Stealing action. |
 |
Map | x1 | The spelunker is immune from the Twisty Passages! misfortune, and ignores the orange star Hex placement restrictions during the Explore phase. |
 |
Matches | x1 | Can only be used in a hex with a Methane Token. Ignites Methane, which is explained in the Player Turn section. |
 |
Medkit | x4 | Restores the spelunker to full health (4HP), and removes all Poison effects. |
 |
Pick | x1 | During the Explore phase, the spelunker may replace one of the drawn treasures with a random re-draw from the bag. |
 |
Rations | x2 | Acts as a 5th HP for the spelunker, except without the associated AP. When used, the player places the Rations Token in the space provided on the Player Mat to indicate this. |
|
Rope | x4 | The spelunker may ignore slopes on hexes. |
 |
Silver Ingot | x2 | This is a Treasure worth 8VP at the end of the game. |
 |
Sports Drink | x1 | When used, gives the spelunker +2AP which must be used before the end of the player's turn. |
 |
Trainers | x1 | The spelunker is immune from the Trip! Misfortune, and has one extra AP per turn which can only be used for Move actions. |
 |
Water | x2 | The spelunker is immune from the Thirst! Misfortune. Any spelunker in a hex with a Pool may acquire one for free. |
Play continues in turn until all spelunkers have either exited the cave or died, as explained below. Once the caves contain no living spelunkers, the game ends.
The procedure followed for each player's turn depends on whether they are still in the caves, or whether they have exited.
This is how all the players start out, naturally. The player's turn follows the phases below.
| Move | 1AP |
The spelunker moves to an adjacent Hex, obeying any passage restrictons. If there are any Hazards are present (which the spelunker isn't immune from) in the hex being entered, the spelunker suffers the effects. If there are any Hazard Icons printed on the Hex, then those Hazards are Intensified as explained in the Hazard rules. If the spelunker is Grue-proof and enters a hex with a Grue in it, they move the Grue to another unoccupied Hex with a Grue Hazard Icon on it. If no such Hex exists, the Grue is removed from the map, and the Grue Hazard rating is increased by 1. If the spelunker ends their turn on the Base Camp Hex, they remove all Misfortunes they may have. |
|---|---|---|
| Explore | ⋆AP |
The spelunker is exploring a new area of the caves, and follows this procedure.
|
| Collect Treasure | 1AP |
If there are any Treasure Tokens on the spelunker's Hex, and the spelunker is in a passageway with the location marker, the player picks them up, examines them, keeps one, and returns the rest face-down to the Hex. |
| Collect Items | 1AP |
If the spelunker is in a passageway with the location marker, they may collect any and all items on their Hex (but may never have more than one of the same type). |
| Drop Items | 0AP |
The spelunker may drop any and all items they are carrying. These items are remain in the Hex to be picked up later. Note that this is different than deploying an item (such as a Flare or Dynamite), which would activate the item. |
| Steal | 2AP | If a spelunker is in the same Hex as another spelunker, they may steal one Treasure Token at random from that spelunker and then immediately move to an adjacent hex (following normal movement rules and restrictions). Spelunkers with an active Knife Item are immune from being stolen from. Stealing is only available as an action after the first Level 2 Hex has been revealed. |
| Use Item | 1AP |
Any Item with a ☒ on it may be discarded back to the supply for its effect as listed in the Item descriptions. If Grue Repellent is used, the Item Token is moved to the Status Token area of the player's Player Mat. The spelunker is Grue-proof until their next Upkeep phase. If the Dynamite is used, the Item Token is moved to the Status Token area of the player's Player Mat, and and a Lit Dynamite Hazard Token is placed in their current Hex. If a Flare is used, the Item Token is discarded to the supply, and a Lit Flare Hazard Token is placed on the Hex. If the Matches are used in a Hex with a Methane Hazard Token, the Matches Item Token is discarded, and the methane is ignited. All Methane Hazard Tokens in this Hex and contiguous to it are affected; all spelunkers in the affected Hexes take -1HP, and all Grues in the affected area are removed. All the involved Methane Hazard Tokens are then removed from the map and returned to the supply. |
| Exit Caves | ⋆AP ⌀ |
If the spelunker is on the Base Camp Hex, they may leave the caves. Their pawn is moved to the Surface Hex for the remainder of the game, and they collect the highest two remaining treasures there. From this point on, the player follows the turn procedure for being Outside The Caves. |
If a spelunker is out of the caves (ie, their pawn is on the Surface Hex), or the player's spelunker has died, the player follows this procedure.
When a spelunker takes damage, they remove one HP token from their player mat. This may be from an already-expended MP slot.
When a spelunker is healed, they add a HP token to their player mat, and they may spend the associated MP the same turn. Spelunkers may not have more than 4HP.
Any spelunker reduced to 0HP dies. Any Items they were carrying are deposited in their Hex, all their Treasure Tokens are returned to the Bag Of Fate. Their pawn is then moved to the Surface Hex, and they take the highest two Treasure Tokens there. They are now considered Out Of The Caves.
The Hazard Track represents the severity of the various hazards of exploring the caves. The severity of each is tracked separately on the Hazard Track; these begin at zero at the start of the game, and increase throughout the game. A Hazard is Active in a Hex if that hex contains an Effect Token of that Hazard.
 |
Bats | Any spelunker without wearing a Helmet entering a Hex with a Bats Token takes -1HP. |
|---|---|---|
 |
Methane | Any spelunker without wearing a Gas Mask entering a Hex with a Methane Token takes -1HP. |
 |
Tremors | Any spelunker without wearing Boots entering a Hex with a Tremors Token takes -1HP. |
 |
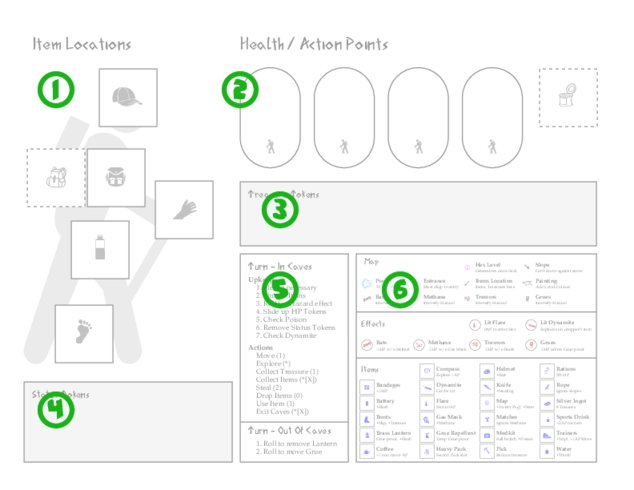
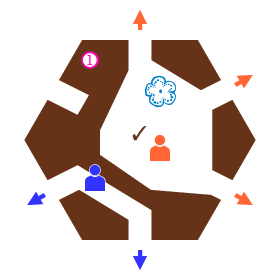
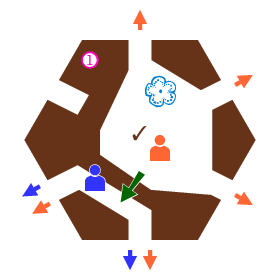
Grues | Grues are affected by Grue-proof spelunkers. No non-Grue-proof spelunker can enter a Hex with a Grue Token; if a grue-proof spelunker enters a hex with a Grue Token, the player moves the Grue to an adjacent hex (which must not itself have any Grue-proof spelunkers in it). Each spelunker in a hex that a Grue moves to takes -1HP. If a Grue cannot move in this way, it is removed, and the Hazard Track Grues rating is increased by 1. |
Whenever a hex is revealed during an Explore action which has a hazard icon on it, that hazard is Intensified; if there are multiple Hazard Tokens, the indicated Hazards are intensified as indicated. Intensifying a hazard raises the rating of that Hazard, and the active player rolls a die; if the die roll is less than the Hazard's rating, the Hazard is Activated.
Activating a Hazard means that a number of Hazard Tokens equal to the Hazard's rating get added to hexes with the corresponding Hazard symbol which don't already have one. These are chosen by the activating player. If all available hexes have a token, the extra ones aren't placed. If Grues are activated, any Grues already on the board are triggered prior to adding new Grues; see below.
For example, if a spelunker takes an Explore action, and the revealed hex shows a Bats Icon, then the Bats Hazard rating is increased by 1, say from 3 to 4. Then the die is rolled, and if the die is less than 4, then the player places up to 4 Bats Tokens on hexes on the board which don't already contain a Bats Token. There are now bats in these hexes. If, later, another Hex with a Bats Icon appears, the Hazard is again intensified; however, if the die roll isn't less than the new rating, then no new bats appear, though any existing Bats Tokens remain.
The regular effect of active Hazards (that is, Hexes with Hazard Effect Tokens in them) is that a spelunker without the correct protection entering such a Hex recieves -1HP. A spelunker wearing a Helmet is immune from Bats, a spelunker wearing a Gas Mask is immune from Methane, and a spelunker wearing Boots is immune from Tremors. Grue-proof Spelunkers are protected from Grues.
In addition to these map exploration and movement effects, Cards and other effects may cause Hazards to be Triggered, representing more a more aggressive effect of the Hazard. While the normal Hazard intensification and activation affects the map as a whole, a triggered hazard represents a specific instance of a hazard in a specific hex.
When Bats, Tremors, or Methane are triggered, the Hazard Pawn is placed on the affected hex. Any spelunker currently on that hex suffers the effects of the hazard as normal, even if they had already suffered the effects when they entered the Hex. The further effects depend on the type of hazard.
When Grues are triggered, this moves all Grues on the board. At no point may a Grue move into, or remain in a Hex with at least one Grue-proof spelunker.
Once all spelunkers have either died or left the caves, the game ends. The player with the largest total value of Treasure Tokens (and Silver Ingot Items) is the winner. If there is a tie, the player with the higher HP wins. If there is still a tie, the player with the least amount of Item Tokens wins.